目次
はじめに
本記事では、React+ReduxアプリケーションにJWT認証を導入する方法を説明します。ログインページとダッシュボードページで構成されるシンプルなアプリケーションを実際に作りながら認証つきのセキュアなSPAアプリケーションを作る方法を解説します。
少し長いですが、全手順解説&GitHubに実際に動作するソースコードがあるので、わからないところがあっても最後まで進められるようになっています!
作るもの
ソースコード
動作確認やわからないところの確認のため実際に動くソースコードを用意しました!
フロントエンド:React+Redux+JWT
バックエンド:JWTのモックサーバ
使うもの
お持ちでない方はリンクよりゲットしてください!
バックエンドの準備
バックエンドの起動
JWT認証のモックサーバを用意しました。下記の手順でクローンして起動してください。
git clone https://github.com/windii-legend/express-jwt-mock.git

cd express-jwt-mock

sudo node index.js
バックエンドの動作
バックエンドの仕様について説明します。実装については説明しませんが、
Express【Node.js】のAPIにJWT認証を導入しよう!
の記事で詳しく説明しているので興味ある方はぜひどうぞ!
バックエンドはlocalhost:8080で立ち上がります。
仕様といっても単純で以下の2つのエンドポイントを持ちます。
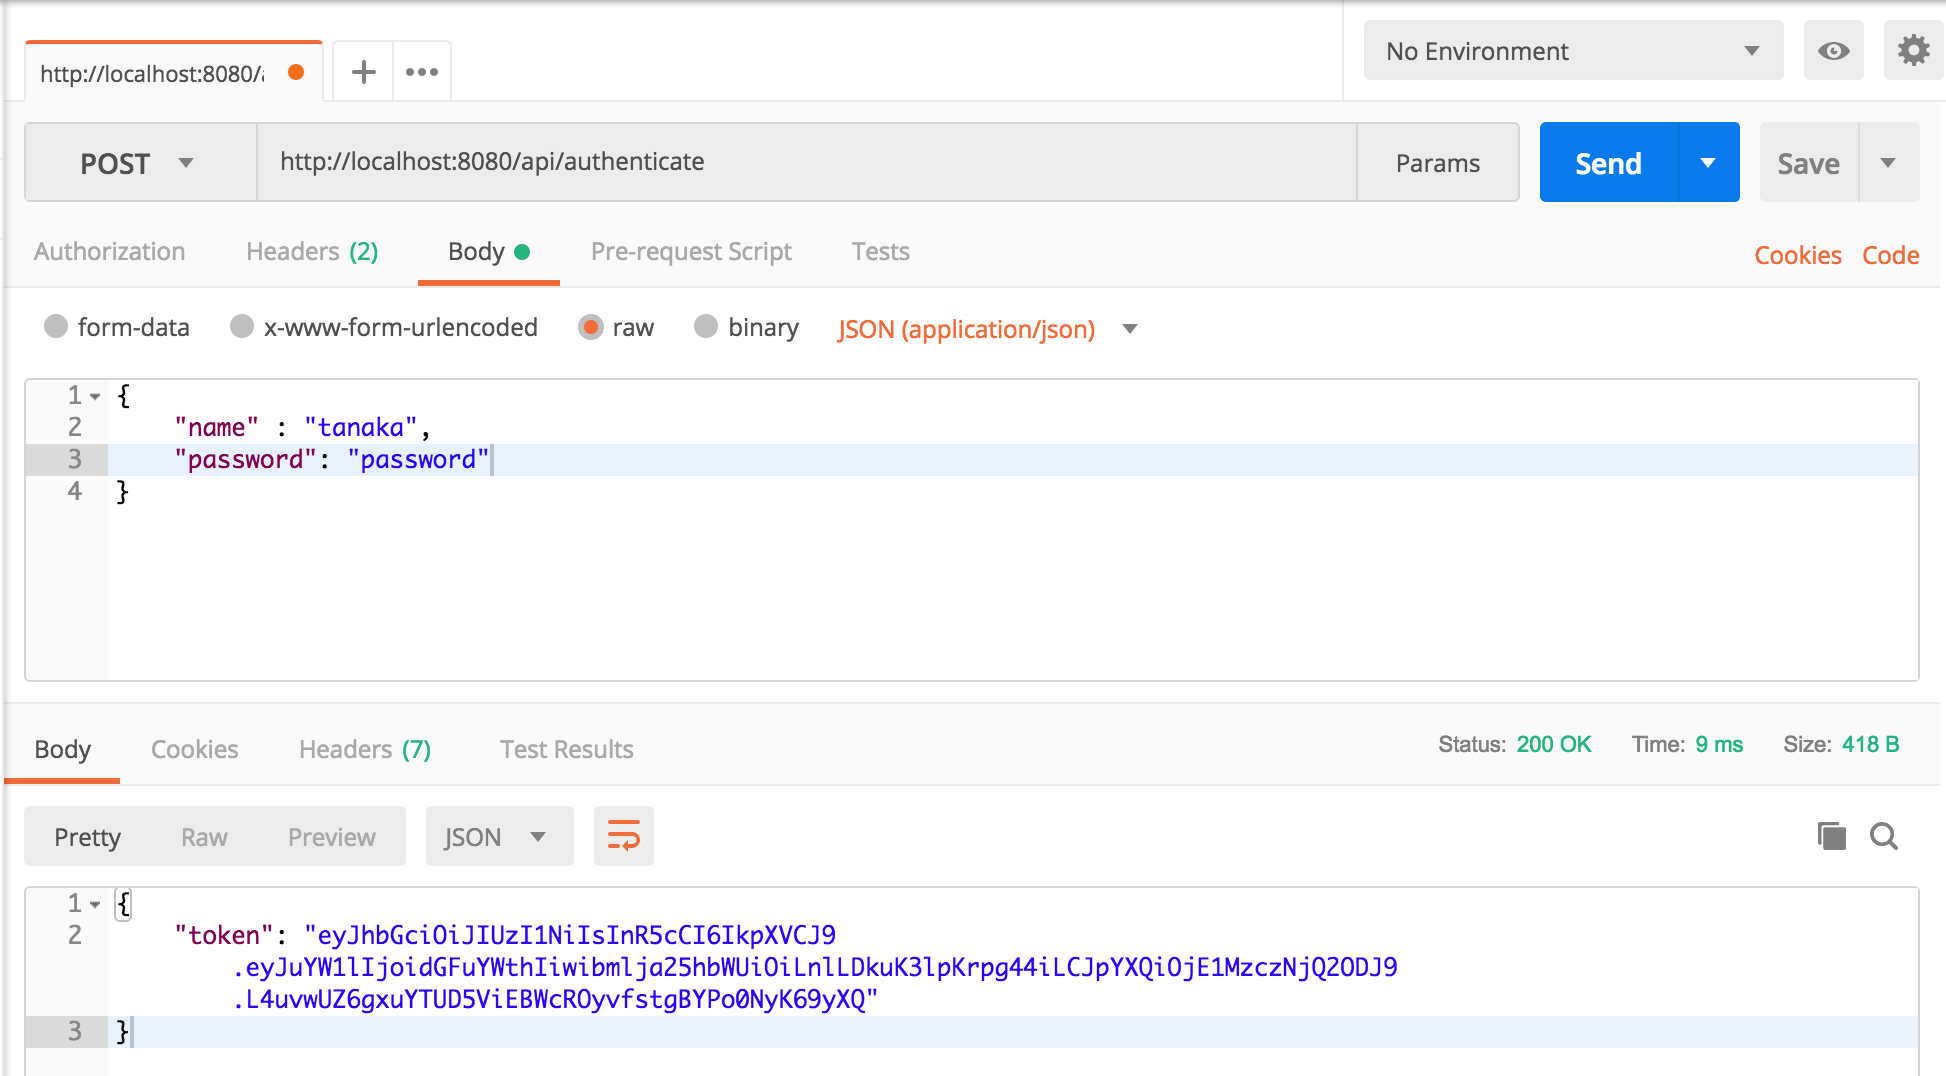
[POST] /api/authenticate
ユーザ名とパスワードをリクエストするとトークンが返ってくるエンドポイント。
リクエストの形は以下のような感じ。
{
  "name": "tanaka",
  "password": "password",
}
レスポンスの形は以下のような感じ。
{"token": "abscsgadjfkajfXXaajfdXXXXXX"}
[GET] /api/me [認証あり]
HeaderにAuthorization: Bearer [JsonWebToken]を付与すると以下のようなレスポンスを返す。
{
    "id": 2,
    "name": "jiro",
    "nickname": "鈴木次郎"
}
実際にPostmanを使ってリクエストしてみた結果がこちら。
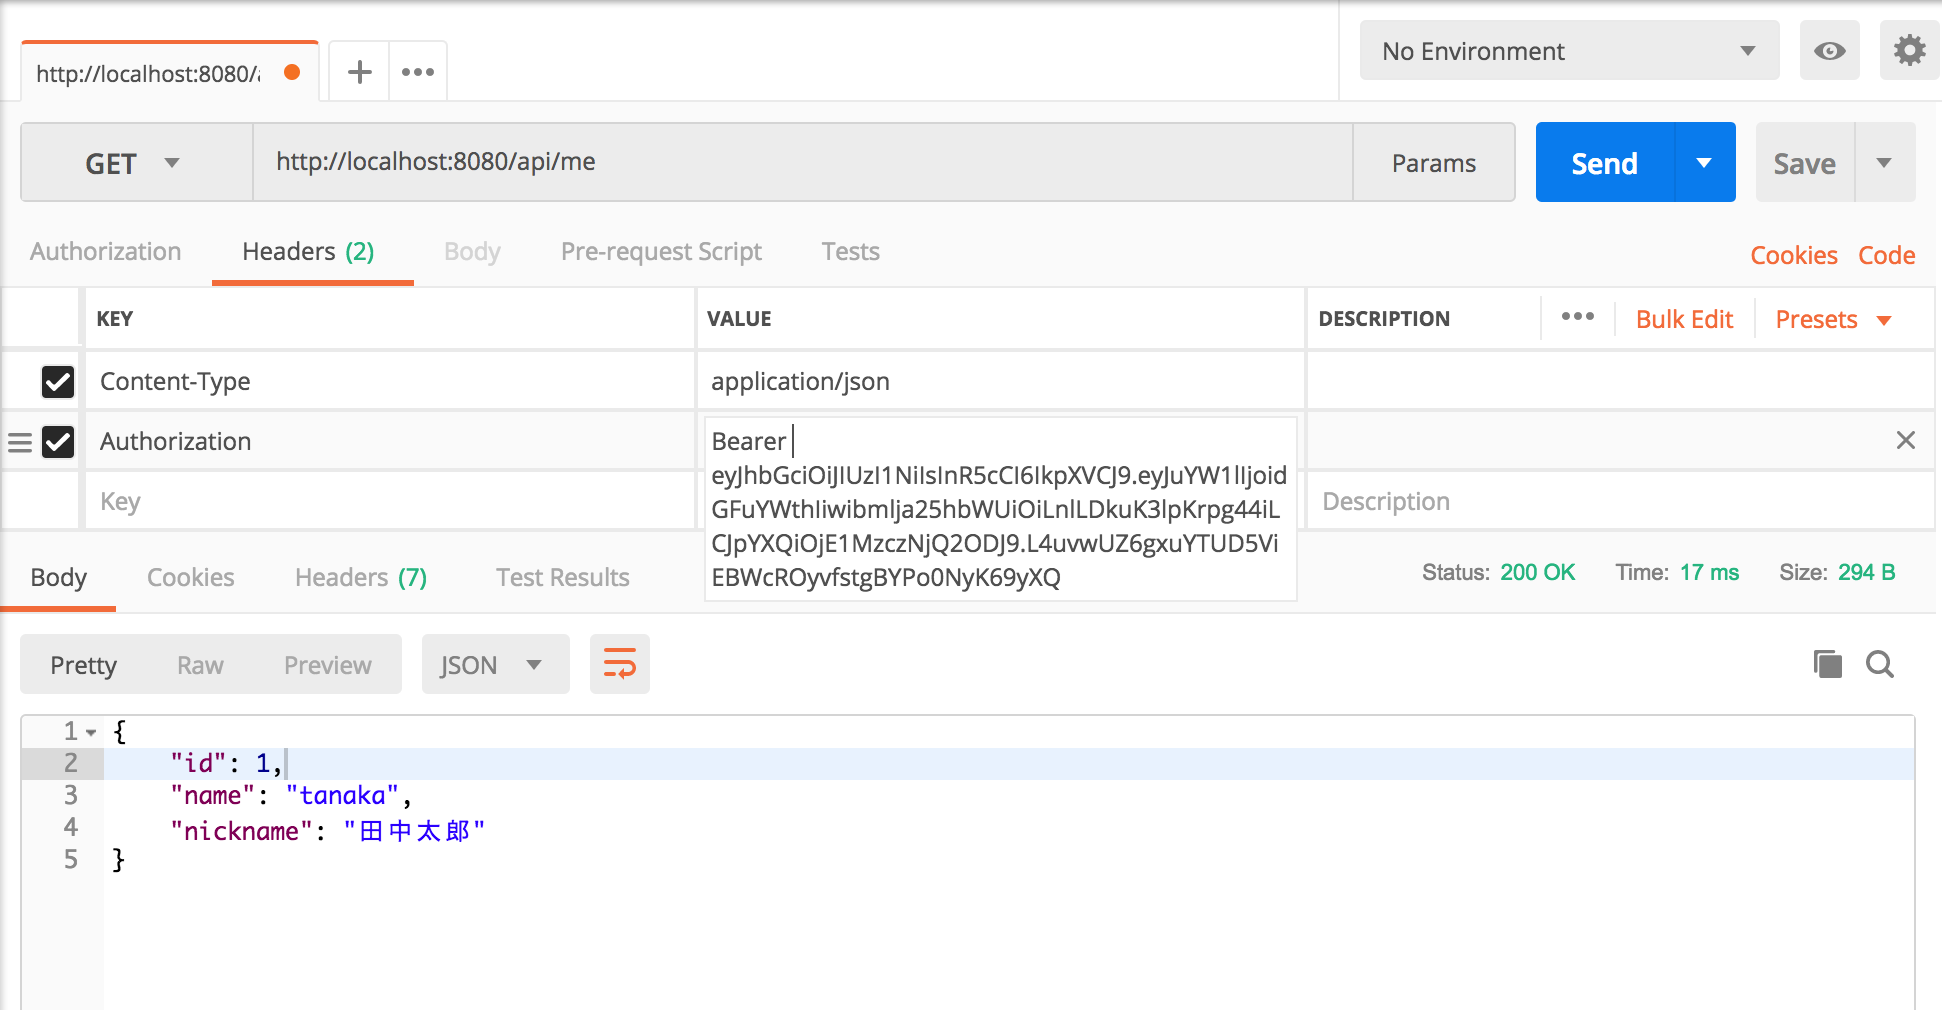
特に2つ目がポイントで、HeadersタブでAuthorizationにBearer XXXXXXXXXXXX
と指定しています。XXXXXの部分には先ほど取得したJWTトークンが入ります。
ちなみに
{
  "name": "tanaka",
  "password": "password"
}
でトークンが返ってきます。
少し長くなりましたが以上でJWT認証サーバの説明は終わりです。フロントエンドに取り掛かりましょう!!
フロントエンドの動作確認
すぐに動作を確認したい場合は以下の手順でクローン&起動してください。
(先ほどのサーバを起動しておいてください。)
git clone https://github.com/windii-legend/react-jwt-example.git
cd react-jwt-example
npm install
npm start
うまく動いたでしょうか?
それでは、フロントエンドの実装をはじめて行きましょう。本記事の1ページ目はjwt認証を実装する前の設定をひたすらやります。JWT認証の実装方法だけをやりたい方は
git clone https://github.com/windii-legend/react-jwt-starter-kit.git
でソースを取得して、2ページ目にGO!!
プロジェクトの作成
まずはプロジェクトを作成しましょう。
create-react-app react-jwt-example
プロジェクトを作成したら以下のようなディレクトリ構成を作ります。
(React+Reduxの一般的な構成です。)

ReduxとRouterの設定
【5分でできる】ReactにRouterとRudexをサクッと設定する方法
こちらの記事にまとめておいたので手順に沿ってルーティングを設定して行きます。
(あまり詳しくは説明しないのでわからないところがあったら上記記事を参考にしてください!
m(_ _)mゴメン)
Reduxの設定
npm install --save redux react-redux redux-logger
src/reducers配下にindex.jsという名前のファイルを作成して以下のようにしてください。
export const dumb = (state = {}) => state;
src/index.jsを以下のようにしてください。
import React from 'react';
import ReactDOM from 'react-dom';
import './index.css';
import App from './App';
import registerServiceWorker from './registerServiceWorker';

import { createStore, combineReducers, applyMiddleware } from 'redux';
import { Provider } from 'react-redux';

import * as reducers from './reducers';

import logger from 'redux-logger';

// Storeを作成する
const store = createStore(
  combineReducers(reducers),
  // applyMiddleware関数でredux-loggerを設定
  applyMiddleware(logger)
);

ReactDOM.render(
  <Provider store={store}>
    <App />
  </Provider>
, document.getElementById('root'));
registerServiceWorker();
Routerの設定
npm install --save react-router-dom react-router-redux@next history
src/index.jsを以下のように書き換えます。
import React from 'react';
import ReactDOM from 'react-dom';
import './index.css';
import App from './App';
import registerServiceWorker from './registerServiceWorker';

import { createStore, combineReducers, applyMiddleware } from 'redux';
import { Provider } from 'react-redux';

import * as reducers from './reducers';

// ルーターの設定
import createBrowserHistory from 'history/createBrowserHistory';
import { routerReducer, routerMiddleware, ConnectedRouter } from 'react-router-redux';

import logger from 'redux-logger';

// historyインスタンスを作成する処理追加
const history = createBrowserHistory();

// Storeを作成する
const store = createStore(
  combineReducers({
    ...reducers,
    router: routerReducer
  }),
  // applyMiddleware関数でredux-loggerを設定
  applyMiddleware(
    routerMiddleware(history),
    logger
  )
);

ReactDOM.render(
  <Provider store={store}>
    {/*ConnectedRouterコンポーネントを追加*/}
    <ConnectedRouter history={history}>
      <App/>
    </ConnectedRouter>
  </Provider>
, document.getElementById('root'));
registerServiceWorker();
ここまでできたら一度
npm start
で起動して見ましょう!エラーが表示されなければReduxとRouterの設定は完了です!
画面の作成
画面の見栄えが悪いとやる気が出にくいのである程度綺麗なUIを作ります。今回はMaterial UIをつかってみましょう。
npm install @material-ui/core --save
npm install @material-ui/icons --save
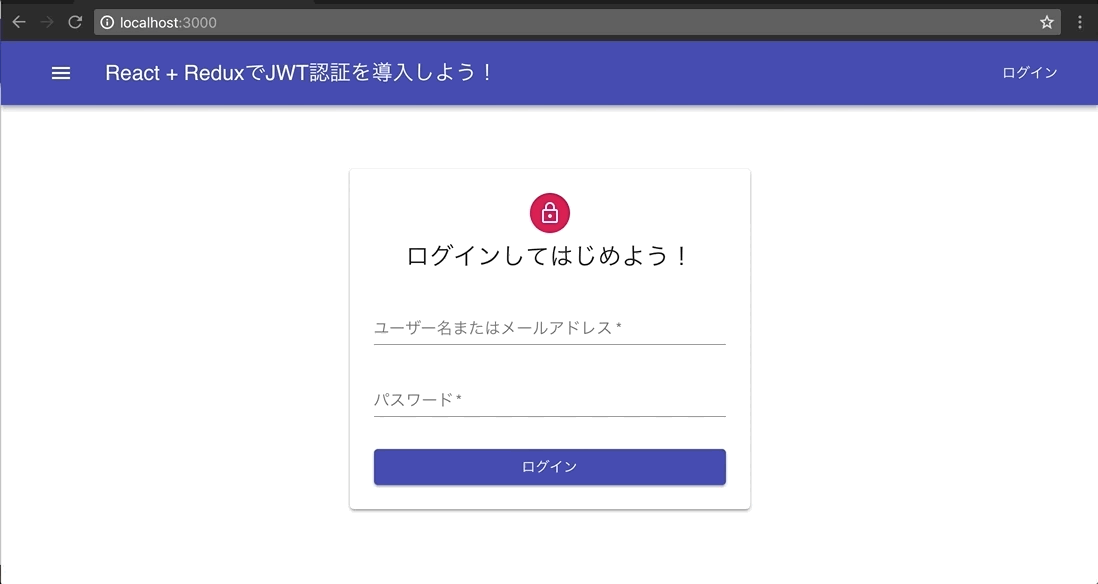
src/components/以下にLogin.js,Dashboard.js、Header.jsを作成して以下のようにしましょう。こちらはレイアウトの問題だけなのでコピーアンドペーストで問題ありません。
src/components/Login.js
import React, { Component } from 'react';

import Avatar from '@material-ui/core/Avatar';
import Button from '@material-ui/core/Button';
import CssBaseline from '@material-ui/core/CssBaseline';
import FormControl from '@material-ui/core/FormControl';
import Input from '@material-ui/core/Input';
import InputLabel from '@material-ui/core/InputLabel';
import LockIcon from '@material-ui/icons/LockOutlined';
import Paper from '@material-ui/core/Paper';
import Typography from '@material-ui/core/Typography';
import withStyles from '@material-ui/core/styles/withStyles';
import Header from './Header';

const styles = theme => ({
  layout: {
    width: 'auto',
    display: 'block',
    marginLeft: theme.spacing.unit * 3,
    marginRight: theme.spacing.unit * 3,
    [theme.breakpoints.up(400 + theme.spacing.unit * 3 * 2)]: {
      width: 400,
      marginLeft: 'auto',
      marginRight: 'auto',
    },
  },
  paper: {
    marginTop: theme.spacing.unit * 8,
    display: 'flex',
    flexDirection: 'column',
    alignItems: 'center',
    padding: `${theme.spacing.unit * 2}px ${theme.spacing.unit * 3}px ${theme.spacing.unit * 3}px`,
  },
  avatar: {
    margin: theme.spacing.unit,
    backgroundColor: theme.palette.secondary.main,
  },
  form: {
    width: '100%', // Fix IE11 issue.
    marginTop: theme.spacing.unit,
  },
  submit: {
    marginTop: theme.spacing.unit * 3,
  },
  alert: {
    color: 'red',
    fontSize: 14
  }
});

class Login extends Component {

  constructor(props) {
    super(props);
    this.state = {
      username: '',
      password: '',
    }
    this.handleChange = this.handleChange.bind(this);
    this.handleSubmit = this.handleSubmit.bind(this);
  }

  handleChange(e) {
    const { name, value } = e.target;
    this.setState({ [name]: value });
  }

  handleSubmit(e) {
    e.preventDefault();
    const { username, password } = this.state;
  }
  render(){
    const { classes } = this.props;
    return (
      <React.Fragment>
        <Header menu="ログイン"/>
        <CssBaseline />
        <main className={classes.layout}>
          <Paper className={classes.paper}>
            <Avatar className={classes.avatar}>
              <LockIcon />
            </Avatar>
            <Typography variant="headline">ログインしてはじめよう!</Typography>
            {this.props.error ?
              <p className={classes.alert}>ユーザ名またはパスワードが正しくありません。</p>
              : ''
            }
            <form className={classes.form}>
              <FormControl margin="normal" required fullWidth>
                <InputLabel htmlFor="email">ユーザー名またはメールアドレス</InputLabel>
                <Input id="email" name="username" autoFocus onChange={this.handleChange}/>
              </FormControl>
              <FormControl margin="normal" required fullWidth>
                <InputLabel htmlFor="password">パスワード</InputLabel>
                <Input
                  name="password"
                  type="password"
                  id="password"
                  autoComplete="current-password"
                  onChange={this.handleChange}
                />
              </FormControl>
              <Button
                type="submit"
                fullWidth
                variant="raised"
                color="primary"
                className={classes.submit}
                onClick={this.handleSubmit}
              >
                ログイン
              </Button>
            </form>
          </Paper>
        </main>
      </React.Fragment>
    );
  }
}
export default withStyles(styles)(Login);
src/components/Dashboard.js
import React, { Component } from 'react';
import { withStyles } from '@material-ui/core/styles';
import Paper from '@material-ui/core/Paper';
import Typography from '@material-ui/core/Typography';
import Header from './Header';
const styles = theme => ({
  root: {
    ...theme.mixins.gutters(),
    paddingTop: theme.spacing.unit * 2,
    paddingBottom: theme.spacing.unit * 2,
  },
  paper: {
    width: '50%',
    margin: '0 auto',
    minWidth: 300,
    marginTop: theme.spacing.unit * 8,
    display: 'flex',
    flexDirection: 'column',
    alignItems: 'center',
    padding: `${theme.spacing.unit * 2}px ${theme.spacing.unit * 3}px ${theme.spacing.unit * 3}px`,
  },
});

class Dashboard extends Component {
  render() {
    const { classes} = this.props;
    return (
      <div>
        <Header menu="ログアウト" onClick={this.props.logout}/>
        <Paper className={classes.paper} elevation={1}>
          <Typography variant="headline" component="h3">
            <strong>田中太郎</strong>さん、ダッシュボードへようこそ!
          </Typography>
          <Typography component="p">
            さあ、JWT認証をマスターしたらSPAアプリケーションを今すぐ開発しましょう!
          </Typography>
        </Paper>
      </div>
    );
  }
}


export default withStyles(styles)(Dashboard);
src/components/Header.js
import React from 'react';
import AppBar from '@material-ui/core/AppBar';
import Toolbar from '@material-ui/core/Toolbar';
import Typography from '@material-ui/core/Typography';
import Button from '@material-ui/core/Button';
import IconButton from '@material-ui/core/IconButton';
import MenuIcon from '@material-ui/icons/Menu';

import { withStyles } from '@material-ui/core/styles';

const styles = {
  grow: {
    flexGrow: 1,
  },
  menuButton: {
    marginLeft: 12,
    marginRight: 20
  }
}

function header(props) {
  const { classes } = props;
  return (
    <AppBar position="static">
      <Toolbar>
        <IconButton className={classes.menuButton} color="inherit" aria-label="Menu">
          <MenuIcon />
        </IconButton>
        <Typography variant="title" color="inherit" className={classes.grow}>
          React + ReduxでJWT認証を導入しよう!
        </Typography>
          <Button color="inherit" onClick={props.onClick}>{props.menu}</Button>
      </Toolbar>
    </AppBar>
  );
}

export default withStyles(styles)(header);
次にsrc/containers/配下にLogin.jsとDashboard.jsを作成して以下のようにします。
src/containers/Login.js
import { connect } from 'react-redux';
import Login from '../components/Login';


const mapStateToProps = (state, ownProps) => ({});

const mapDispatchToProps = dispatch => ({});

export default connect(mapStateToProps, mapDispatchToProps)(Login);
src/containers/Dashboard.js
import { connect } from 'react-redux';
import Dashboard from '../components/Dashboard';

const mapStateToProps = (state, ownProps) => ({});

const mapDispatchToProps = dispatch => ({});

export default connect(mapStateToProps, mapDispatchToProps)(Dashboard);
src/App.jsを以下のように書き換えます。
import React, { Component } from 'react';
import { Route} from 'react-router-dom';

import { withStyles } from '@material-ui/core/styles';

import Login from './containers/Login';
import Dashboard from './containers/Dashboard';


const styles = {
  root: {
    flexGrow: 1,
  },
}

class App extends Component {
  render() {
    const { classes } = this.props;
    return (
      <div className={classes.root}>
        <Route path="/dashboard" component={Dashboard}></Route>
        <Route path="/" exact={true} component={Login}></Route>
      </div>
    );
  }
}

export default withStyles(styles)(App);
この状態で
npm start
してみて、localhost:3000とlocalhost:3000/dashboardにアクセスしてみてください。画面が表示されれば成功です。
うまくいかなくても問題ありません!これまでのソースは以下のようにすれば取得できます。
git clone https://github.com/windii-legend/react-jwt-starter-kit.git
cd react-jwt-starter-kit
npm install
お疲れ様でした!次のページではいよいよJWT認証の導入しましょう!
WINDII
最新記事 by WINDII (全て見る)
- Canvaが最高すぎる。使い方を完全ガイド【チュートリアルあり】 - 2019年5月14日
- 人気急上昇中のLaravelをはじめよう!【徹底解説】 - 2019年4月23日
- Laravelの認可を理解して実装してみよう! - 2019年3月29日
この記事へのコメントはありません。